|
COVID-19 AWARENESS: Please note that we are taking all necessary precautions to keep our on-air personalities, interviewees and crew safe during this challenging time. However, we do run repeat stories and segments that were shot last year, before social distancing practices were recommended by health officials. If you see our hosts standing close to someone, please be assured that the segment was shot before March of 2020. We thank you for your concern and your interest in Garden Time.
Welcome to the REAL first day of spring! I can call it that because this is our first hour long program of the Garden Time show for this year. Every year we kick off 13 weeks of hour long shows on the first weekend of April. For us, we know that spring has finally arrived! We love this time of year. It is so crazy busy and everyone is so excited for the change of weather and the start to the gardening season.
It is a lot of work putting a longer show together, but it is a lot of work in the garden for our viewers. It is fun work!
We hope everyone has a wonderful Passover and Easter!
This week we featured...
Egan Spring Color
Spring is all about color! The drab browns and greys of winter turn into the bright colors of spring. When you are looking at that spring color realize that all of it may not be ready for your outside gardening space. One of the best places to get some of that early spring color and tips for keeping it healthy is at Egan Gardens (503-393-2131). We stopped to talk to Ellen about the ‘April Fools’ plants. She told us these are the plants that are showing up in your garden centers but they may be a little tender to get them outside right now. Gardeners get ‘fooled’ every year into putting out plants that might not be ready for the chilly nights still to come. One of those ‘teaser’ plants that still needs warmth are begonias. The Solenia begonias are great because they love sun and shade. Some begonias will fry in the sun, but not these. They have masses of color all summer long too. A similar plant to the Solenias are the I’Conia begonias. These are more upright and tolerate a huge range of conditions and have vibrant colors as well. For those full shade areas there are the ever popular Rex Begonias. These have wonderful blooms, but their foliage patterns, colors and textures make this showstopper a must have in the shade garden. Some of the color plants that can go outside right now include the showy Martha Washington Geraniums. They are very cold tolerant and can go outside now.
We then headed outside to look at the perennial color that is blooming right now. Corydalis are blooming now and a lot of people are not familiar with the newer varieties and colors that are available. The ‘Blue Heron’ corydalis is one of the newest and has the typical trumpet shaped bunches of blooms. These are covered in blooms right now and they are very fragrant too! Another early bloomer that likes the cooler days are the Anemones. The Harmony Anemone varieties come in a bunch of different colors and will keep blooming until the heat arrives in summer. Then these hardy plants will take a break until they return next spring. The final plant was as favorite in nearly everyone’s garden, the Columbine. These are one that the kids love because of the unique bloom shapes and bright colors. They love the Northwest and our conditions here. You need a few of these in your garden!
Egan’s is always full of color and it is just a joy to stroll through the plants on display. Stop by and pick up a few of these beauties to add to your garden.
Dividing Clematis
In the spring everyone wants to get out into the garden to get things done. For a lot of plants though, it may be too early to do much of anything. Clematis is a plant like that. Like most varieties you can’t do much of anything, or so we thought. We stopped by the Rogerson Clematis Collection (971-777-4394) at Luscher Farms to talk to Curator Linda Beutler about what you can do with your clematis. She took us out to do divisions of the herbaceous perennial varieties. Linda pointed out that these perennial types are just coming back and poking their heads out of the ground. If you have an older plant you can see the plant popping up in different areas or points. These plants can be dug up now and divided to provide you or your friends with more plants. We were standing next to ‘Skylark’, a variety that was just starting to show new growth. To divide this plant Linda dug a large area around the plant to avoid cutting off too many roots. Then she took it to a table and started clearing the root ball of soil. Her favorite tool to do this was a single chopstick. This allowed her to work most of the soil out of the root ball. Once the majority of the soil was removed she had a bucket of water to wash off the rest of the excess soil. This allowed her to see the root ball and look for clumps to divide. As she worked the root ball in her hands the plant started to break apart showing where divisions could be made. These divisions can now be planted back in the garden or shared with friends and family. To plant a small plant in the garden, look for an area that is well drained. Then add organic compost mixed with Rose and Flower food to the planting hole and place the plant in the hole. Backfill with the existing soil and then use a top mulch to keep weeds down and to dress it up a little bit. At the garden they use a crushed gravel on the top. Make sure that the plant gets watered well, but not soaking, until it establishes.
This weekend is a great time to pick up a new clematis at Rogerson. They are opening up the sales area for the season! You can stop by on Monday, Wednesday and Friday, plus the weekends, between 10am and 2 pm to pick up a plant for your garden. While you’re there be sure to stroll the garden and see what is in bloom. Of course you can visit the garden during daylight hours during the spring and summer, even if you don’t get a plant. To see what is currently blooming, check out their website!
FPG Ladies Day
In the past, a lot of people marked the beginning of spring with a stop at French Prairie Gardens Ladies Only Night. This event showcased the newest plants on the market and a basket planting party with tasty treats and wonderful beverages, all wrapped up in a fun evening. Last year the big event was cancelled like many others. This year however, the event has returned, although with some changes. To learn more we stopped by French Prairie Gardens (503-633-8445) and talked with Katey about the new event. They are now calling it Ladies Day and there are 2 days where you can stop by and still have all the fun! First Katey showed us the new hanging basket combos that they have this year. These combinations included small dahlias and coleus in the center as a focal point. One of the coolest plants was called Crystal Sky, related to the Night Sky spotted petunias and it looked stunning. Some of the other basket combinations had mixes that were perfect for sun and some for shade.
If you come to the Ladies Day you would be able to see these combinations or make a combination of your own. This year the event is scheduled for the 10th and 11th of April and by reserving your space through their Facebook page or their website you get a 2 hour block to spend with your friends and family. Of course the baked treats and beverages will still be available too! So this spring renew your old ‘Ladies Only’ tradition, or start a new one at French Prairie Gardens.
Dry Shade Groundcovers
We live in a great part of the country. We can grow nearly everything! One spot that is difficult for everyone to grow plants in is that dry, shady area in the garden. You know the places, under eaves and under large trees. Tough conditions for any plant! There are plants that actually do well in these areas and to get a couple of ideas we stopped by Little Prince of Oregon. They grow some wonderful plants, many of which you can find at your local independent garden center or on-line on their website. To see some of their selections we met with Nick in one of their greenhouses. He started by showing us the epimediums they grow. These perennials have showy little flowers that pop up over the foliage. ‘Rubrum’ has red edged leaves that look great by themselves, while the small variety called ‘Purple Pixie’ had smaller leaves and dainty purple flowers. These plants can handle those dry conditions and you can even cut back the leaves in late winter to see even more of the blooms when they appear. The leaves will grow back over the summer and fill in nicely. The next group were a couple oxalis plants. Some people call these clovers, but that just confuses people into thinking of the clover in your lawn, but these are very different. Oxalis ‘Oregana’ is a native to our area and makes a great ground cover for any area, but especially those dry shady places. The Oxalis ‘Klamath Ruby’ grows in the same areas but also has the bright pinkish blooms over the darker leaves that are a deep red underneath. If you are looking for great leaf color the Euonymus ‘Wolongs Ghost’ has what you are looking for. The longer leaves of this plant have brightly colored veins that pop in the shade. The final group of plants were a selection of Pachysandra. These are a great ground cover that spread over an area by little tendrils but not too aggressively. The original variety is the ‘Terminalis’. The Green Sheen has a glossier leaf and darker stems, with the Silver Edge that has a cream colored edge to the small leaves.
When planting these you have to make sure that they get a good start with a little transplant fertilizer and good watering for the first year. Once they are established they will grow and thrive in those dry, shade conditions, but they do need a little help to get started. You can find these Little Prince plants at your local garden center, just look for the frog with a crown, or you can order them through their website. If you have a tough area give them a try!
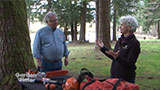
Stihl Chainsaws
Stihl tools are known as an industry leader in power equipment for the garden. After the winter we just had with snow and ice, some people may be looking for a STIHL chainsaw to do a little bit of cleaning in their yards and gardens. To get some tips on choosing a chainsaw we stopped by to visit with Wayne to hear what Stihl had in the way of power efficient and ‘Clean and Green’ power tools. The first thing we talked about was getting the right tool for the job. Some will want the biggest chainsaw in the neighborhood, but after a few cuts that chainsaw will just be too big and heavy to get much done. Not only will you be wrestling a large chainsaw, but you have to maintain it between uses. He recommended that you leave the large saws to the experts and if you do have a big job, get a professional in to do those big cuts. Then you can use a smaller battery powered STIHL tool to do the rest. The new lines of STIHL chainsaws are perfect for the homeowner. They are lightweight and they don’t need a ton of maintenance to keep them up and running. No mixing gas and oil, and making sure that the it can fire up every spring. These newer models are great for simply plugging in a new charged battery, and away you go. Of course to chose the right one for you, Wayne recommends that you visit an authorized STIHL dealer to get some help from an expert.
Chainsaws are not the only thing that you can use to get your garden ready for the spring. He had one of the newest tools from STIHL. He also had the GTA 26 Handheld Power Pruner. This small battery powered unit was perfect for those small pruning jobs. You can cut material up to 3 inches in diameter which is about as big as your weekend jobs get. This tool was so well designed and worked so smoothly, that many other manufacturers are trying to copy it. If you see one of these ‘knockoffs’ that cost less, just pass it by. This unit, as with all STIHL tools, is designed to work without a hitch for many years to come.
Wayne also talked about safety equipment. He reminded us to always wear the correct protective gear when you operate any power tool. Good shoes, protective chaps, buttoned long sleeves, along with head, face and eye protection is a must. To see more of the great line of STIHL tools check online for your local dealer.
New Hedge Choices
Late this winter we had a the snow and ice storm that really did some damage to our larger landscape trees and shrubs. In fact, people noticed that once some of those trees and shrubs were gone, they had much less privacy than before. Now there is a push for barrier and hedge plants to reestablish those boundaries again. To get some ideas on what to plant to replace those damaged and destroyed we stopped by Bauman’s Farm and Garden (503-792-3524) to talk with Brian. He told us that he had been driving around the area and had seen some of the damage. Arborvitae that look like they had exploded or branches of other plants splayed out all over the ground. Then he told us about some of his choices. His first choice for reestablishing a hedge or barrier is the Leyland Cypress. It grows fast and it will grow in almost all types of conditions and soils. The key to having a healthy cypress and establishing your hedge is to make sure they are planted correctly and well-watered for at least the first year. This will give them a good start and you will have a healthy plant and not a brown stick in a year. A couple of cypress that Brian had included were the ‘Blue Pyramid’ and the ‘Golden Arizona’. These plants will give you great foliage and texture, but they also have a nice fragrance when you run your hands over the needles. If you are looking for something a little different he suggested the Arbutus or ‘Strawberry Tree’. This plant is evergreen and has a great bark. It also produces a wonderful red berry that the wildlife love. The variety we saw was ‘Marina’ and you can prune it to shape. One of the old standby plants that perform well are the boxwoods. These make a great barrier plant if you are look for privacy or even a shorter hedge. There are a few different varieties that grow in various shapes and sizes. English Boxwoods provide a nice formal look to the garden. Another plant that looks great year round is the evergreen magnolia. One that we had on display was ‘Bracken’s Brown Beauty’. This one has dark green leaves with a fuzzy brown covering under the leaves, plus you get some great blooms too.
Of course, as we said before, planting these correctly is the key to their long term success. Brian recommended a good planting compost to amend the soil, plus a nice starter fertilizer. You are spending a lot of money on some of these plants, you really should spend a little extra to give them the nutrients that they need for a healthy start. The Organic Bio-tone Starter from Espoma was a must have for all their plantings. This product helps your plants use the existing nutrients in the soil as well as gives them a gentle boost for a healthy start. If you are looking for some great hedge material, stop by Bauman’s, and if you are looking to give your plants the best start, pick up some Espoma products!
Planting a Fruit Tree
Growing your own fruits and vegetables is the hot topic this spring. Vegetables are generally pretty easy, but planting and growing fruit trees are a long term commitment. Ryan and Judy had a few tips on planting a bare-root versus a tree in a container. A container tree will have all of its roots attached including the small fibrous roots that will help it avoid transplant shock. The bare root plant has been harvested by a machine and its roots will be a little banged up by the harvesting. The benefit of these bare root trees is that they are cheaper! Planting a tree is simple. First, prepare a hole that is almost twice as wide as the root ball of the tree. Then score the roots if the tree is in a container. That means cut them along the sides so they will promote growth into the new soil. Then add a root stimulator and a transplant fertilizer to help get the plant off to a good start. We used the Espoma Bio-tone Starter. A lot of fruit trees are grafted on semi-dwarfing root stock. That means it will stay shorter than a normal fruit tree. We also saw where the graft was on the trunk. You have to remember not to bury this graft. It will cause the root stock to grow and that will weaken the tree. Once planted it will take a tree a year or two to produce fruit, so don’t be in a hurry to collect those cherry pie recipes just yet… If you are looking to add a fruit tree or a fruiting bush to your garden, stop by your local garden center. Remember the planting instructions are the same for bareroot or container fruit trees and the experts at the garden center can walk you through the process.
Sometimes finding small trees for small spaces can be very difficult, but one of the recent trends in fruit trees features smaller trees with multiple varieties on one trunk. The tree that we planted was a small pear tree with 4 different types of fruit on it. In a future story we’ll show you how easy it is to trellis or espalier a small pear tree on a wire between a couple of posts. By training a tree on a fence, wall or posts, you gain the benefit of the fruit production without the tree taking over your garden. We picked up this pear tree at One Green World and they had lots of traditional and some unusual fruit trees to choose from.
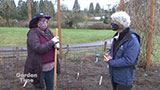
Building an Espalier Trellis
Earlier we showed you how to plant a small espalier fruit tree, and in this story we will show you how to train that espalier tree on wires between 2 posts. First, we started by getting a level out and some wire. The level makes sure that your wire is straight because your soil level may vary between the posts. We made sure the wire was running just slightly above the opposing branches of the tree so we could easily attach the branches without bending them too much or forcing them at weird angles. We then drilled pilot holes into the posts and screwed in eye bolts and attached the wire on one side. One the other side we attached a long piece of wire too. In the middle of these wires we placed a turnbuckle. This is a small piece of metal that has screws that allow you to tighten the wires without too much trouble. The eyebolts allow the plant to be trained away from the fence or wall if there is one. This allows for airflow around the tree and helps prevent disease problems. The second wire can then be measured from the first wire and eyebolts since they were level. Once again you want your wire to just be an inch or two above the graft of the branches.
Once the wires are in place you can use a plastic gardeners stretchy tape to secure the branches to the wires. Make sure that you tie them on a little loosely so the branches have room to grow. You want to make sure that the tips of the branches are secured to the wire too. As time passes you can remove the oldest ties as the plant becomes established and the branches become trained.
This is just one method of training a tree and one that we have found very effective. You can find other methods on-line or you can get ideas from your local garden center.
Tsugawa Conifers
The spring always holds the promise of different colors and textures, but you don’t need to look for blooms to get those. You can look toward some of the new varieties of dwarf conifers. We found that Tsugawa Nursery (877-658-0566) in Woodland had a great selection of these interesting plants and we found Brian Tsugawa to show us a few. When we say dwarf, we are not talking about really short plants, though some do stay pretty short. Some of these can get 12-20 feet tall so be sure to read the tags when you are choosing one. The first one we saw was the ‘Chief Joseph’, a type of Lodgepole pine. The green needles of summer turn into a bright gold in the cold days of winter. They will hold that color through part of the spring and then go back to green again. The next 2 plants were from the same family, Japanese White Pines, but completely different. The Fukuzumi was an upright pine with twisty branches that had long needles. It looked like it could use a haircut with its weird twisting needles. The smaller one, Catherine Elizabeth, was smaller and more compact. Both are very slow growing, but the shorter one almost looked like a bonsai, it was so small. The next conifer was the Cryptomeria ‘Golden Promise’. This tree also stays small and only grows a couple inches each year. The color of the new growth has a golden color edged in crimson. Even though it looks sharp and prickly, it is kind of soft to the touch. The final dwarf conifer was a Korean Fir called ‘Ice Breaker’. The needles on this one are quite unique. They curl in tightly around the branches and have a silver glow to them in the sunlight. This one would be great in a container right up near your porch or patio.
These are just a few of the dwarf conifers that you will find at Tsugawa’s. Don’t forget they are loaded with other trees as well and they are the go-to place for Japanese maples as well. If you are looking for a tree of any size or shape, you just need to go to Tsugawa’s.
Limoncello
This year we had a great lemon year! We grow an Improved Meyer’s Lemon tree which is a variety that does well in our area (with some winter protection). This past winter we had over 30 lemons on our small tree. What do you do when life hands you that many lemons, you don’t make lemonade, you make Limoncello! Limoncello is an lemon liqueur from the south of Italy. It is the second most popular drink in Italy and is very easy to make. We started by taking 8 lemons and zesting 4 of them and pealing the other 4 with a vegetable peeler. The key to great flavor is to getting as much of the outer skin and not a lot of the white pith underneath. The pith will make your Limoncello very bitter. The zest and peels were placed into a wide mouth quart sized canning jar. Then we added vodka to the jar and filled it to the top. Then we placed the jar in a cool dark place for a couple of weeks. Every few days we would turn the jars to mix the lemons and alcohol. This would release the oils from the lemon peels. After the month was up, we emptied the jar into a large strainer to separate the lemons and the infused alcohol. Next we made a simple syrup. This was 4 cups of water and 3 cups of sugar. We went with a little less sugar so it wouldn’t be too sweet. This was dissolved together in a pan over low heat. When everything was dissolved we let the simple syrup cool down. Then in a large bowl we mixed simple syrup and the infused alcohol together. That was strained and filtered through a cheesecloth and placed in bottles in the fridge for us to enjoy all summer long. We love ours really chilled so we also keep a bottle in the freezer. It is a great drink to sip on those warm summer days!
|