|


|
|
It is hard to believe it is the first of June already! We seemed to have just said hello to spring and here we are looking at summer’s arrival in just a couple of weeks. Of course, with the early heat we had a lot of people thinking that we passed spring and just went into summer. But as these last few weeks have shown us, spring is still here. We will continue to get those spring showers (at least while the Rose Festival is here) and probably for weeks after ‘summer’ arrives. Just know that the heat will continue to rise and days will get drier. Enjoy these spring days while you can!
This week we featured...
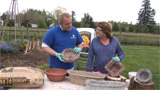
Hypertufa Pots
Hypertufa is the art of making lightweight cement pots. Donna Wright from Black Gold/Sungro gave us the step by step instructions for making these wonderful pots. Hypertufa means ‘light weight cement pots’ and she walked William through the process of making them. The 3 ingredients to remember are ‘Peat, Perlite, and Portland Cement’. You can customize them by adding moss, creating patterns and changing the color when you make them. It is a great project for families and will last for years! Check out the recipe if you missed it on the air. You'll find the recipe here.
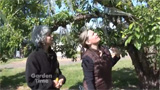
Pear in a Bottle
Recently we noticed a bottle of brandy that had a whole pear in it. This fascinated us. This isn’t easy. How do they get a whole pear inside a bottle! You just don’t build a pear like you would a ship! This requires some planning! To learn how it is done we contacted Clear Creek Distillery (503-248-9470) in Portland. They are the ones responsible for this feat of engineering. We met with Rachel Inman in a Hood River orchard to see how they do it. Rachel met us with a bottle and some twine. She told us how they pick certain pears on the tree while they were still small to place them in the bottles. These pears are judged to be the ones that will survive until the end of the season and ripen, not easy since all pear trees will have ‘June drop’ where the tree self prunes to get rid of unviable fruit. Once she pealed away the smaller fruit and picked her ‘king’ fruit she placed the bottle upside down over the fruit. This allows the fruit to grow inside the bottle and avoids rain and irrigation water from entering the bottle. The morning condensation is not a problem either. It burns off with the morning sun. The only problem is sunburn! Once the sun get high in the sky the bottom of the bottle can act as a magnifying glass to burn the fruit. Rachel then has to cut little bags and cover the bottom of the bottles to prevent the fruit from getting cooked. Once the fruit is ripe they simply give the bottle a tug and a twist and the fruit comes off and remains whole in the bottle. Then they take it to the distillery and clean the fruit with small brushes and fill the bottles with wonderful Oregon Pear brandy! If you would like to have a sample of this tasty distilled beverage you can stop by the Clear Creek Distillery in Portland during tasting hours. Simply check out their website for times!
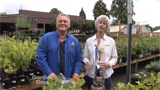
Hedge Choices
When people want privacy, they will often use a row of plants to do the job. It creates texture and it is cheap to install. The problem is the same old choices that people use in their plantings, arborvitae, photinia, and laurel. Lee Powell from Garland Nursery (1-800-296-6601) found a few other choices that people can consider. He showed us some really different choices for the home gardener which included English boxwood ‘Green Tower’, Euonymus ‘Green Spire’, Waxleaf Privet, Arbutus (Strawberry Tree) ‘Compacta’, Japanese Holly ‘Sky Pencil’, Ceonothus (California Lilac) ‘Victoria’ and Pacific Wax Myrtle ‘Californica’. All of these will grow into great hedges but there is a trade off, it’s patience versus dollars. You can plant a few plants, save some money but end up waiting for a few years for it to fill in, OR you can spend the money and get more plants, plant them closer together and then your hedge will fill in faster. There are some precautions too. Make sure you know where your property line is located before you plant and check to make sure there are not any local covenants for your neighborhood that would prevent certain types of plants. If you are looking to create a hedge, check out something different before you plant. You will find a lot of these plants at your local independent garden center and of course, at Garland Nursery.
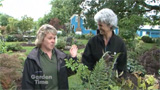
Shade Plants
Some gardeners think that you are limited in the amount of materials you can choose from for a shady spot in your garden. To learn the truth we visited the cute little nursery ‘Out in the Garden’ (503-829-4141) in Molalla and the owner, Carol Westergreen, to see what she could pull together quickly for us for shady areas in the garden. She found a lot of stuff to show us! Some people think that shade plants can be tough, but most of these are push-overs and easy to grow with a little help. You just need to listen to the plant. If it doesn’t like the area it is in, you just move it! That is the beauty of perennials!
Carol brought out some of her favorite perennials. The first plant she showed us was the Actaea ‘White Pearl’ which is a fall blooming perennial. This one is super fragrant and is covered with white berries late in the season. Then we moved to ferns, which are a staple in any shade garden. The first fern was one called ‘Fortune’s Holly’ this is a tall fern and stays evergreen in the winter. We also looked at the back of the leaves and saw they were covered in spores. This is how the ferns reproduce, but some people think it is a disease or bug of some kind. It is totally normal. Then we moved to an Athyrium type of fern called ‘Branford Rambler’. This is a shorter variety of fern that starts out small and then grows during the summer showing off some cool dark stems. Our last fern was more of a groundcover fern. This one was called a ‘Himalayan Maidenhair’ Fern. It has a soft texture in its leaves and stays just 1-2 inches tall all year. It also stays evergreen all winter long, no matter how cold it gets! Next we looked at a shade garden favorite, the hellebore. Carol really likes these plants for their late winter, early spring blooms, and then the great foliage through the rest of the season. The best new plants out there are the Gold Collection including ‘Pink Frost’, ‘Joshua’ and ‘Jacob’. One plant that we haven’t seen much was next, Eupatorium ‘Chocolate’. This one has wonderful dark foliage and clusters of white flowers in mid September.
Shrubs for shady areas are not well known and Carol pulled a couple that thrive in shady, dappled light, areas. The Leucothoe ‘Zeblid’ and ‘Rainbow’ both start out with nice color on the new growth, but they really shine in the late fall and winter when they get burgundy leaves, providing a nice backdrop for your other perennial plants. Next was the perennial of the year for 2013, ‘Variegated Solomon’s Seal’. This one grows in clumps around the garden, with cream colored edges on the leaves and nice white flowers that dangle below the leaves. It also has an evergreen cousin that has similar characteristics. As we were getting down to the final plants we saw a hardy begonia. Most people think of begonias as tender indoor plants, but the ‘Begonia grandis’ is one that will survive in the outdoor garden. It has wonderful leaf color and dainty little pink flowers later in the season. Our final plant was the Ligularia. Carol brought out 2 different varieties of this ‘drama queen’ plant. She called them that because they really look like they are dying if they even get a little bit dry. You just give them a little water that they perk right back up again. The taller variety was ‘Przewalskii’ with blooms that can reach 6 feet high. It also blooms in late June or early July, a great time since there are not a lot of blooms at that time of year. The smaller variety was ‘Confetti’. This one has a cool leaf color and each leaf seemed to be a little different, putting on a colorful show in those shadiest areas of your garden. If you are looking for shade plants, don’t get discouraged. Stop by your local garden center, or better yet, stop by and see Carol at Out in the Garden Nursery!
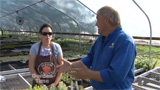
Sedum Planting
Sedums are a confusing plant. A lot of people think that they are tender and temperamental, but that is not the case. We stopped by Sedum Chicks (503-508-7727) to learn a little more about these garden beauties! You may know Sedum Chicks from seeing them at GardenPalooza or the Beaverton Farmers Market, but they appear at garden events all over the state. We started off by talking to Becky, the owner, about the differences between sedums and sempervivums. Most people think that the names are interchangeable, but we found out that sedums are more of a ground cover type of plant and sempervivums are more of the rosette looking plant. They do like similar growing conditions and the range of sedums and sempervivums means you can find one for just about any location. Just like any plant though, you need to pay attention to their needs when you plant them. One of the major needs of these plants is a well drained container. They don’t like to sit in wet conditions. We moved over to Becky’s planting bench and while her little ones played in the background we planted up a hypertufa container. She really packed in the 4 plants into a tight hypertufa container (check out our link here to make your own hypertufa pot). Becky also uses the Black Gold Natural and Organic soil because these plants need nutrients and great drainage and she gets both with this soil. She recommends that you don’t use soil from your garden. This makes it harder for your plants to thrive and may slow their growth. If you are looking for a great plant for your containers or rock garden, sedums and sempervivums will fill the bill. You can check your local independent garden center or for a larger selection, check out Sedum Chicks at the many garden events around the area (including GardenPalooza). Find out more by checking Becky’s website.
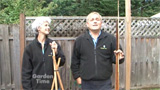
4 Simple Trellises
If you are looking to add height to your garden you can buy something, or you can build a simple trellis yourself! William and Judy walked us through the steps of building a couple of different ones. The first one was easy. William used a tomato cage to help his climbing peas. Judy then showed us the second trellis, which was a simple teepee of bamboo sticks. She tied them at the top and they made a quick and simple structure. The third structure was a folding trellis made from PVC pipe. We cut the pipe into various lengths to fit our garden size. This one had 3, ¾ inch pipes that were 3 feet long. These are for the two base pieces and the top. Then we cut 4 longer pieces (6 foot) these are for the sides. 6 elbows create the square and then we also had 2 tees. The top of the tee was a bigger size than the rest of the pipe. This will allow the folding of the trellis when the season is done. The finishing touch was the string. Last year we used a hemp string for the plants to climb on. This quickly broke down and that meant it didn’t work as well as we had hoped. This year we are using a cotton fiber string, which will give our trellis the strength to give our beans and other climbing plants a good strong base to grow on. The final one was a simple set-up of eyehooks that were screwed into the post on an arbor that we built a couple of weeks ago. Then we ran fishing wire through the hooks to make a structure for the plants to climb on. The fishing wire was invisible to the naked eye and if you are looking for more support you could use a wire, or if you wanted something more ‘earth-friendly’ a hemp string would be good. Give one (or all of them) a try and see if you can get your gardening ‘off the ground’.
Parr Small Planter
No matter what time of year we can look to creating colorful planters that can bring more gardening space closer to your doorstep. Amber Kozlowski and our friends at Parr Lumber (503-644-1178) have come up with a simple plan for a small cedar planter that uses only 2 boards. With a couple of minutes, a hammer (or a power nailer), some 5d galvanized nails and a miter saw we were able to construct a planter that will last for years. The best part? It cost less than 10 bucks to build. Amber also recommended that we seal the cedar so it lasts longer and that we drill a couple of drainage holes too. Still, not bad for a simple, quick to assemble planter!
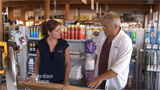
Bird Deterrents
Your strawberries, early blueberries and just about everything else edible is disappearing! The birds are taking everything in your garden, leaving little or nothing for you to enjoy. The same thing is happening to us, so we traveled to Portland Nursery (503-231-5050) on Stark to see what they have to scare the flying felons away. The first thing we found was holographic tape. This is a reflective tape that sparkles when it is hung by your plants to scare them off. Another item was bird netting. This provides a barrier so they can’t get to the plants. The other product was the fake owl. Owls are natural predators of most small birds and that presence of an owl is sometime enough to do the trick. We also found some tangle foot. This is a sticky material that birds don’t like to get on their feet. Finally, we found the Scarecrow sprinkler. The Scarecrow uses a photoelectric eye to sense when you have an animal in the area, then it sends a blast of water to scare the critter away. This product works really well, but is also the most expensive deterrent. There are also some home remedies. You can also hang tin pie plates, or old CD’s in your garden and they sometimes work just as well as the products in the store. There is one more tip to follow. Whatever you use, move it around your garden so the birds and other animals don’t get used to it!
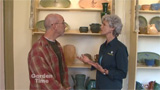
Lonesomeville Pottery
Pottery is a lost art. Sure you can find pots at your local store, but the high quality, high fired, pottery is now mass produced and that it why it is great to know that one of the best pottery houses on the west coast is right here in Portland. We dropped by Lonesomeville Pottery (503-774-5387) and met with Wayne Hughes, one of the owners and learned how they make this incredibly decorative pottery. It all starts with an original design by Northwest artist Danny Hills, then Todd or Jose makes a mold of that design. Then they glaze it and fire it, producing a limited amount of pieces and then sell it around the country. The influence for the piece can be found in pottery houses from the 1930’s or even quick trips to Seattle. The other big difference is the high fired technique they use. Low fired pottery is not as hard and will chip and break easily. The high fired process also means that it is dishwasher and oven safe. They also work really hard to made pottery with multiple glazes. This means that there is a big variation of colors even within the same piece. We took a tour around the inside the house to see their showroom and were blown away by all the different styles of pottery they made from plates and cups to tiles and vases. There was quite a selection. Your chance to pick up some of this pottery is this weekend at their Spring Open Gardens and Studio Sale. It happens June 1st from 10am to 4pm. If you happen to miss the sale you can head to one of the great local retailers they supply. You can find a complete list of locations on their website.
|
|
|
|
|
|
|
|