|
COVID-19 AWARENESS: Please note that we are taking all necessary precautions to keep our on-air personalities, interviewees and crew safe during this challenging time. However, we do run repeat stories and segments that were shot last year, before social distancing practices were recommended by health officials. If you see our hosts standing close to someone, please be assured that the segment was shot before March of 2020. We thank you for your concern and your interest in Garden Time.
GardenPalooza has returned! We are so happy to be able to see everyone again after having to take a break the last 2 years. As you probably know by now we are at a new location. We are at Bauman's Farm and Garden near Woodburn. We have our usual huge amount of vendors for your garden shopping needs, plus all the fun things that Bauman's offers. There is the petting zoo, the kids area, the bakery and lots of wide open spaces! It is going to be a great day! Be sure to check out www.GardenPalooza.com for all the details.
This week we featured...
Out in the Garden - GardenPalooza Preview
The benefit of GardenPalooza is seeing lots of great plants in one place. Of course we always see great plants at Out in the Garden Nursery (503-829-4141) in Molalla. Carol grows wonderful plants any time of year, but she had some wonderful ones that she will be bringing to GardenPalooza. We started out with a grass. Carol loves grasses and she had one that is an early starter. This Calamagrotis Caspian not only has an early start on its green growth, it will also bloom sooner in your garden. The seed heads and blades will soften the hard edges of your other garden plants and their movement in the wind is mesmerizing. She then pulled up 2 different lilacs. These are shrubby lilacs. One was Miss Kim and the other was Palibin. These are shorter and more compact than the taller varieties out there. They were loaded with fragrant blooms and will start showing off in just a few weeks in your garden. If you are looking for a larger shrub that has great foliage and nice flowers, the Sambucus is a great plant. It can get big so make sure you give it lots of room. The 3 that we saw included the dark, fine foliaged, Black Lace with big pink flowers, the Lemon Lace with white flowers and the Gold Towers, also with white flowers. With the fine 'cut-leaf' foliage, they are great for creating contrast in your garden. Another large shrub that likes morning sun and some shade is the Aucuba. This one has bright variegation and can handle dry shade. It is a slow grower and can brighten up any dark space in your garden. Hydrangea 'Little Honey' was next in line and it is known for its wonderful oak leaf shape and the color variations it gets in the foliage. Morning sun and afternoon shade will help that coloring of the leaves. It also gets really great fall color too.
We then moved to some smaller plants for your garden. The first was a hardy mum. The fall mums are forced into bloom and are not hardy in our area. The hardy mums can go in the ground now and you will be rewarded with colorful blooms year after year. If you are looking for early season blooms, check out native Camas. This bulb sends out pretty blue bloom in the mid to late spring and can handle wetter conditions than a regular bulb and not rot. Ferns are also popular for the native garden and Carol had a lot of them. We saw the smaller Spleenwort fern with its tiny fronds, the Dragons Tail fern with its 'wild hair' look, and a couple of Hart's Tongue ferns. The regular wide leafed and the 'Cristata' with the ruffled fronds. Carol had another of her favorites next the Beesia. This is a shade plant with wide green leaves and a purple tinge to them. It also gets white spikes of flowers, but the real interest is the foliage. Finally we saw some of the new primroses that Carol has for sale. These were all double blooms and really great for pops of colors around your garden. They are looking great right now in the garden.
If you want to see some of these great plants, stop by Carol's booth at GardenPalooza, or stop by her nursery in Molalla.
Dramm Quality Tour
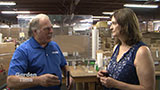
For over 75 years Dramm Corporation has built quality watering and garden tools, and other garden products. Recently producers Jeff and Therese were able to visit the Dramm facility to see how they make these quality, 'American Made' tools. Therese even had a chance to make a watering wand herself! While we were there we met with Kurt Dramm, Heidi Dramm Becker and Ron Greening to talk about the company and how they stay on the cutting edge of technology. Kurt started by talking about the history of the company. His father John, was an inventor that worked in the cut flower business in Wisconsin and came up with quite a few ideas. There was a need for a watering tool that would gently water plants without washing out fertilizer, soil or damage the plants. He came up with the 400 Water Breaker Nozzle. This was revolutionary and was in high demand for the commercial growing industry. Home gardeners saw it too and wanted the same tool that the professionals used. That started the company on a path to addressing the needs of commercial growers and home gardeners. Soon to follow were watering wands, sprinklers, hoses, cutting tools and watering cans. These tools are rigorously tested and are built to last! All the parts are made in America and most of the tools are assembled in Manitowoc, Wisconsin. As we saw from the wand that Therese was able to build, the process ensures a great tool.
We also heard that they are now producing a high quality Organic Plant Food too. In a few weeks we will take a look at that product and learn how it helps keep the environment clean while producing an outstanding fertilizer product.
When you need a watering tool, remember to check out the colorful Dramm tool display at you local garden center or nursery.
Hydrangeas Plus - GardenPalooza Preview
Hydrangeas are the perfect plant for the Northwest. Sun or shade there are so many to choose from. When you have a hydrangea in your garden you will be rewarded with a hardy plant, that will give you lots of blooms. The best place to get hydrangeas is at Hydrangeas Plus (866-433-7896). We met with owner, Kristin, to see some of the plants she will be bringing to GardenPalooza this Saturday. Kristin loves serrata hydrangeas. They are more compact and hardy than some of the other types on the market, and they have great fall color when the temps start getting colder. Her first one was the 'Tiara'. This one has a blue 'lace-cap' bloom. The second one was a climbing type of hydrangea called 'Platt's Dwarf'. This one has a white lace-cap bloom and smaller leaves with a serrated edge. We then moved to a macrophylla type of hydrangea, 'Niedersachen'. This is one of your traditional blue hydrangeas and a favorite of Kristin's. The next plant was one called 'Summer Frost'. This one has blush pink blooms, but the real interest is that the leaves will start to turn yellow in the summer sun. Then, the final one on the table was 'souvenir de presidente' with large blue flowers that bloom on new growth. We also saw one that was a sun loving hydrangea, 'AnnaBelle', with huge white blooms.
When you buy a plant, know where you are going to plant it. There are sun loving hydrangeas and shade loving ones. Put your plant in the right place to help ensure its success. Dig an extra large hole and add amendments and transplant fertilizer, and then give it a good drink of water. If you are looking to prune your hydrangea back a little bit, check out the Hydrangeas Plus website for care tips with pictures to help you get the job done. This is also the time to add aluminum sulfate to change your blooms to blue (for some varieties) or to pink/red by adding garden lime.
If you have any questions about hydrangeas or would like to add one to your garden, stop by GardenPalooza (www.GardenPalooza.com) and see Kristin, or check out the Hydrangeas Plus website.
Bauman's Planting Tips
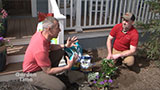
Spring is the time for planting and the things you do now will help your planting succeed and your new plants thrive. To get some tips on planting we stopped by Bauman's Farm and Garden (503-792-3524) to chat with Brian Bauman. We met him in front of his old home which is right next to the store. This is the place where Brian grew up and is now the site of the offices for the employees. Out front are the same garden beds that have been there for decades, but they needed a little refreshing. Brian chose to replant them with some of the great plants they grow at Bauman's, but first the soil needed a little boost. To do that Brian picked the Organic Land and Sea Gourmet Compost from Espoma. This new soil amendment was the newest to the complete line of composts and potting soils from Espoma. This one is called Land and Sea because it combines the best peat and humus from the land and crab & lobster shells from the sea. This gives you a great compost loaded with tons of nitrogen. It also has the 2 different mycorrhizae to help with superior root growth. This soil amendment was worked into the existing soil. Then as he planted the new plants Brian also added the Bio-Tone Starter fertilizer. This transplant fertilizer helps the plants deal with transplant shock and gives them a little more nutrients to boost their early growth. As it is said, you want to give your plants the best chance for a healthy start, and to do that you really need the Espoma products.
You can stop by Bauman's anytime and get these great products, but this weekend is really special. Espoma will have a booth at GardenPalooza. You get all the details on the entire Espoma line of products at their booth. See you there!
Espaliered Fruit Tree
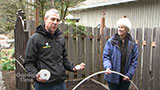
Earlier we showed you how to plant a small espalier fruit tree, and in this story we will show you how to train that espalier tree on wires between 2 posts. First, we started by getting a level out and some wire. The level makes sure that your wire is straight because your soil level may vary between the posts. We made sure the wire was running just slightly above the opposing branches of the tree so we could easily attach the branches without bending them too much or forcing them at weird angles. We then drilled pilot holes into the posts and screwed in eyebolts and attached the wire on one side. On the other side we attached a long piece of wire too. In the middle of these wires we placed a turnbuckle. This is a small piece of metal that has screws that allow you to tighten the wires without too much trouble. The eyebolts allow the plant to be trained away from the fence or wall if there is one. This allows for airflow around the tree and helps prevent disease problems. The second wire can then be measured from the first wire and eyebolts since they were level. Once again you want your wire to just be an inch or two above the graft of the branches.
Once the wires are in place you can use a plastic gardeners stretchy tape to secure the branches to the wires. Make sure that you tie them on a little loosely so the branches have room to grow. You want to make sure that the tips of the branches are secured to the wire too. As time passes you can remove the oldest ties as the plant becomes established and the branches become trained.
This is just one method of training a tree and one that we have found very effective. You can find other methods on-line or you can get ideas from your local garden center.
Picking a Good Clematis
When you are buying a plant it can be hard to pick a quality plant by just looking at it. To get some tips for picking a quality clematis (and tips on picking out any quality plant), we stopped by Rogerson Clematis Garden and talked with Linda Beutler, the curator of the garden in their propagation house. She had set up a bunch of plants for us to look at. She pointed out that sometimes the plant is just too small for the container it is in. That shows us that the plant has just not grown enough to establish itself. Even if it is showing blooms and buds, look for a larger healthier looking plant. Also look at the potting medium (soil), a thick layer of bark chips can hide lots of problems, like slugs. The chips will also take up nitrogen as they decompose so you should remove the chips and replace them with good soil and don't use the chips in the hole when you plant it. Also check for roots that appear in the drainage holes in the bottom of the container. If you see roots here, that means the plant has a good root system for a great start.
If you are looking for some great, well grown clematis plants, be sure to check out the Rogerson Clematis booth at GardenPalooza on Saturday the 9th at Bauman's Farm and Garden. You can also stop by the Rogerson Garden at Luscher Farm where they will be opening their sales terrace for the season. You can check out this link for times when they will have volunteers manning the sales area. You can also check out their website for answers to all your clematis questions and a listing of some of the great events they host at the garden.
Simple Hoop House
In the last couple of years we have shown you how to build your own raised garden bed. Recently we had the itch to get out and do a little early gardening so we came up with a simple way to build a basic hoop house to protect our tender vegetables and get an early start on the gardening season. The one we built was very easy to construct. We stopped by a local hardware store to pick up 4 different materials we would need. We needed 3 hoops for our 6 x 4 foot bed. So we needed 6 pieces of 2 foot long rebar (you might need to get 3 foot pieces if your soil is soft). 3 - twelve foot pieces of PVC ½ inch pipe, plastic sheeting that is clear and at least 6 'mil' thick, and finally some clamps to hold the plastic on the poles. Drive the rebar in the ground on each side of your raised bed. Be sure to call 811 to locate any underground obstacles. Leave about 6-8 inches above the ground and slide the PVC over the rebar on one side. Get some help, bend the pole and slide it over the rebar on the either side of your bed. We did this until we had 3 nice hoops. Then we pulled the plastic sheeting over the hoops and secured it to the hoops with the clamps. At the ends we folded the plastic and secured that to the sides of the raised bed. Remember to check and water your plants since they will not be receiving any direct rainfall. Also, keep your eye on the weather and when days get above 55 degrees you may want to take the plastic off for a few hours until dark.
Now you can plant your tomatoes, peppers and other tender plants out a little sooner than you normally would, or in our case we want the bed to heat up so we get asparagus a few weeks sooner. What a quick and easy way to start your garden early or extend it later this fall!
Al's Outdoor Furniture
With the recent situation involving the Coronavirus, people were looking to do a little vacationing close to home. If you are still looking on improving your outdoor environment, you might want to consider getting some new patio furniture to relax in, or maybe a bistro set where you can enjoy your dinner, but where do you start? To answer that question we stopped at Al's Garden & Home in Sherwood (503-726-1162) and talked to Teri. There are a few things to consider when you are looking for a new set of patio furniture.
The first thing to consider is how you will be spending your time on your patio. Are you an entertainer with lots of social hours or a solo diner kind of person? Do you have room for a lot of furniture or just a few pieces. Visualize people on your deck and see what fits. Then measure and measure again! Take those measurements to your patio shop. Talk to a professional to see what will work for you.
Then think of budget. Are you looking for cheap or for something that will last a long time. Is it constructed well? Can it handle big uncle Charlie? This is where 'you get what you pay for' can come back to haunt you. A well-constructed piece of furniture may be a few dollars more, but you will enjoy it for years instead of months.
Then think of style. What is your décor? Teri recommends that you bring the inside, outside. That means bringing your colors and a similar style from inside your home to outside your home. Create another room for your house, just on your deck. Remember that pillows and cushions can be changed and replaced. That will give your furniture a longer lifespan and create more excitement on your patio.
Finally, check out the furniture. If it doesn't fit or feel right, it probably won't get better over time! Give it a try first. See if you can try it out on your deck or patio, before you buy. Also, don't forget to see about accessories. Would a fire pit or umbrella extend your time on the deck? Plus, you can also add planters or containers to bring a splash of color to your entertaining.
If you are interested in a new set of patio furniture you can check out some of the selections and styles that Al's has on their website. You can also stop by their stores which are open right now.
TOW - Deadheading Your Spring Bulbs
Now is the time to deadhead your early spring blooming plants. By removing the seed heads and flower stalks, you are telling the plant to send the energy to the bulb or tuber to make it stronger for next year's bloom. Don't cut back the foliage yet! That part of the plant is putting the 'gas' in next year's engine. When the foliage dies back in a couple of weeks you can just pick it up and clean up your garden bed then.
|